


Crispy Dill Pickle Parmesan Chicken is a flavorful weeknight dinner. Tender chicken coated in a crispy dill pickle and Parmesan crust. Quick & easy!
Okay, so picture this: it was a Tuesday, one of those Tuesdays, you know? I was scrolling for dinner inspo, craving something, anything, but different. My fridge had a jar of pickles staring me down, and honestly, a lightbulb just went off! Could I really make chicken taste like my favorite crunchy, tangy snack? A few experiments later, and BAM! This Crispy Dill Pickle chicken recipe was born. It’s become a total weeknight hero in my house, and I can't wait for you to try it.
Oh, the first time I made this, I was so excited, I totally forgot to pat the chicken dry after the pickle juice brine. Rookie mistake! When I went to dredge it, the flour just clumped into a weird paste. I didn't expect that! The breading was barely sticking, and I ended up with some rather sad, patchy Crispy Dill Pickle chicken. Lesson learned: pat that chicken, hon!
Ingredients for Your Next Crispy Dill Pickle Chicken Adventure
- 1.5 lbs boneless, skinless chicken breasts: These are our canvas! I always go for boneless, skinless because they cook up super fast and get that perfect cutlet shape. Pounding them thin is key here, not just for even cooking, but so that every bite is loaded with that amazing coating. It really makes all the difference for our Crispy Dill Pickle Chicken, ensuring maximum crunch and flavor. Don't skip this step, it's a game-changer!
- 1/2 cup dill pickle juice: This, my friends, is the secret sauce! Seriously. The pickle juice acts as a quick brine, tenderizing the chicken and infusing it with that irresistible tangy, savory flavor we're chasing. It’s the star ingredient that screams "dill pickle" in every bite. Don't worry, it's not too sour, just perfectly balanced to make our Crispy Dill Pickle Chicken sing. Just grab it straight from your pickle jar!
- 2 large eggs: Our trusty binder! Eggs are essential for getting that breading to stick like glue. I whisk them up well with a splash of water or milk sometimes, just to loosen them a bit. This ensures a nice, even coating for the flour and Panko mixture. Without them, our beautiful Parmesan crust would just slide right off, and we wouldn't have that perfect, crispy texture we're aiming for.
- 1 cup Panko breadcrumbs: Forget regular breadcrumbs, Panko is where the magic happens for serious crispiness! These Japanese-style breadcrumbs are lighter, flakier, and absorb less oil, giving you that incredible shatter-crisp texture that's just addictive. Mixed with the Parmesan, it creates the ultimate crunchy exterior that defines this dish. You need Panko for that glorious crunch on your Crispy Dill Pickle Chicken.
- 1/2 cup grated Parmesan cheese: Oh, Parmesan, you glorious, salty, umami-packed friend! Mixing this into the Panko adds a layer of savory depth and a beautiful golden-brown color as it cooks. It also helps create an even crisper crust, thanks to its fat content. The nutty, salty notes of the Parmesan blend so well with the tangy dill, creating a flavor explosion. Don't skimp on the good stuff here!
- 1/4 cup all-purpose flour, 1 tsp garlic powder, 1 tsp onion powder, 1/2 tsp dried dill, 1/2 tsp black pepper: This is our flavor foundation! The flour gives the egg something to cling to, creating a solid base for the Panko. But it's those spices garlic, onion, and extra dried dill that really amp up the savory, aromatic notes and complement the pickle juice. They ensure every single layer of our Crispy Dill Pickle Chicken is bursting with goodness. A little pepper for a tiny kick, and you’re set!
Mastering Crispy Dill Pickle Chicken: Step-by-Step
- Step 1: Prep Chicken & Brine:
- First things first, grab those chicken breasts and slice them horizontally to get thinner cutlets. Then, lay them between two pieces of plastic wrap and pound them gently to about 1/2-inch thick. This ensures even cooking and max surface area for that amazing coating! Pop them into a shallow dish, pour over the pickle juice, and let them chill for at least 30 minutes. This brining step is crucial for tenderizing and infusing that signature tangy flavor into our Crispy Dill Pickle Chicken. Don't rush it, your taste buds will thank you!
- Step 2: Mix Coating Ingredients:
- While your chicken is brining, let's get our dredging stations ready! In one shallow dish, whisk those eggs well. In another, combine the Panko breadcrumbs, grated Parmesan, flour, garlic powder, onion powder, dried dill, and black pepper. Give it a good stir until everything is perfectly blended. You want those savory, herby, cheesy bits evenly distributed for that ultimate flavor bomb on your Crispy Dill Pickle Chicken. This setup makes the whole breading process so much smoother, honestly.
- Step 3: Dredge Chicken Cutlets:
- Alright, time to get messy! Take your chicken cutlets out of the pickle juice, pat them really dry with paper towels (remember my oops moment?). First, dredge each cutlet in the seasoned flour mixture, shaking off any excess. Then, dip it into the whisked egg, letting any extra drip off. Finally, press it firmly into the Panko-Parmesan mixture, making sure it’s completely coated. You want every inch covered for that glorious Crispy Dill Pickle Chicken crust.
- Step 4: Heat Oil & Sear:
- Now for the sizzle! Heat about 1/4 inch of oil in a large skillet over medium-high heat. You're looking for that shimmering, almost smoking point. Carefully place your breaded chicken cutlets into the hot oil, making sure not to overcrowd the pan. You should hear that beautiful, satisfying sizzle immediately! This initial sear is what gives our Crispy Dill Pickle Chicken that gorgeous golden-brown color and sets the crunch. Work in batches if you need to, don't rush it.
- Step 5: Cook Chicken Thoroughly:
- Let those cutlets cook for about 3-4 minutes per side, or until they're beautifully golden brown and cooked through. You'll see the edges getting nice and crisp. Use a meat thermometer to check for an internal temperature of 165°F (74°C) at the thickest part. This ensures your Crispy Dill Pickle Chicken is safe and juicy, not dry. Don't be afraid to flip them once they've developed that amazing crust. The aroma filling your kitchen right now? Pure happiness!
- Step 6: Rest and Garnish:
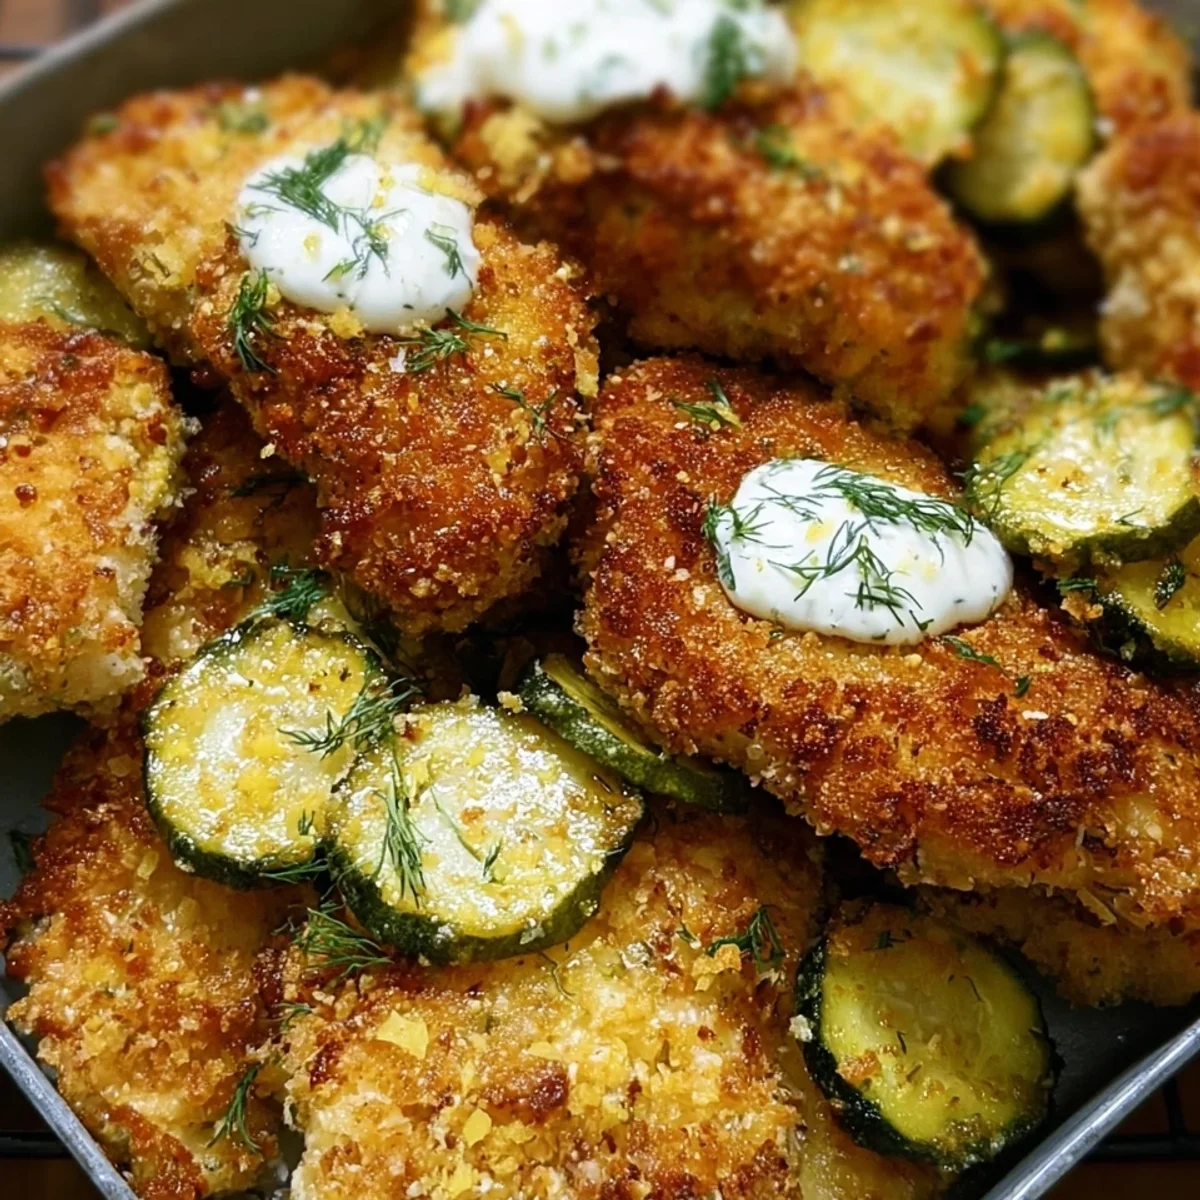
- Once cooked, transfer your glorious Crispy Dill Pickle Chicken to a wire rack set over a baking sheet. This little trick helps keep the bottom from getting soggy while it rests. Let it sit for 5 minutes this allows the juices to redistribute, keeping your chicken super tender. A sprinkle of fresh dill or chopped pickles for garnish adds a pop of color and extra tang. Now, get ready to dig into this weeknight masterpiece!
Honestly, cooking this Crispy Dill Pickle Chicken always feels like a little victory dance. The smell of that Parmesan-Panko crust sizzling, the anticipation of that first tangy, crunchy bite it’s pure joy. It’s one of those recipes that just makes you feel like a kitchen rockstar, even on the busiest of Tuesday nights. A simple pleasure, but oh-so-satisfying, every single time.
Keeping Your Crispy Dill Pickle Chicken Fresh: Storage Hacks
Got leftovers? Lucky you! Store any extra Crispy Dill Pickle Chicken in an airtight container in the fridge for up to 3 days. To reheat and keep that amazing crunch, I swear by the oven or air fryer. Pop them on a baking sheet at 375°F (190°C) for 10-15 minutes, or until heated through and crispy again. Microwaving them is an "oops" moment waiting to happen soggy chicken, no thanks! I've made that mistake, and the sadness was real. A quick oven crisp-up is so worth it.

Mix-and-Match: Swaps for Crispy Dill Pickle Chicken
I've tinkered with this recipe a few times, so I've got some ideas if you're out of something. No Panko? Regular breadcrumbs work, but you'll lose a bit of that epic crunch, to be real. For the chicken, thin-sliced pork cutlets could be a fun swap, giving you a Crispy Dill Pickle Pork. If you're out of fresh dill, you can skip it or use a pinch more dried dill in the coating. Want extra heat? A tiny dash of cayenne in the Panko mix adds a nice kick! It's all about making it your own.
What to Serve with Your Crispy Dill Pickle Chicken
This Crispy Dill Pickle Chicken is a star on its own, but it loves a good supporting cast! I often serve it with a simple side salad and a creamy ranch or blue cheese dressing the cool creaminess is a perfect contrast to the tangy chicken. Roasted potatoes or a fluffy rice pilaf are also fantastic. For a lighter meal, some steamed green beans or asparagus are lovely. And honestly, sometimes I just chop it up and put it on a brioche bun with extra pickles and a dollop of mayo. Diner-style deliciousness!
The Fun Story Behind Crispy Dill Pickle Chicken
You know, the idea of brining chicken in pickle juice isn't exactly new, it's got roots in Southern fried chicken traditions, particularly with using buttermilk to tenderize. But that specific dill pickle tang? That's where things get fun and modern! It’s a playful nod to our love for all things pickle-flavored, from chips to sandwiches. This Crispy Dill Pickle Chicken is my little homage to that trend, bringing together classic American comfort food with a beloved, zesty twist that just screams "home cook ingenuity."
And there you have it, friends! My absolute favorite way to transform a humble chicken breast into something truly special. This Crispy Dill Pickle Chicken is proof that dinner doesn't have to be complicated to be incredibly flavorful and fun. I hope it brings as much joy to your kitchen as it does to mine. Now go forth, get cooking, and let me know your favorite part in the comments below!

FAQs About Making Crispy Dill Pickle Chicken
- Can I use chicken thighs for Crispy Dill Pickle Chicken?
Oh, for sure! Chicken thighs would be super flavorful and juicy. Just make sure to pound them to an even thickness like the breasts, and adjust your cooking time slightly. They might take a minute or two longer per side, but the results will be just as delicious and tangy!
- How long should I brine the chicken?
I'd say at least 30 minutes to get that lovely tangy flavor, but you can go up to 2 hours. Any longer, and the acidity in the pickle juice can start to break down the chicken too much, making it a bit mushy. So, 30 minutes to 2 hours is the sweet spot for perfect Crispy Dill Pickle Chicken.
- What kind of pickles should I use for the juice?
I always use standard dill pickle juice from a jar of good quality, refrigerated dill pickles. The ones with a nice strong dill flavor work best! Avoid sweet pickles or anything too garlicky if you want that classic dill tang. Just reach for your favorite crunchy dill pickle jar!
- Can I bake this chicken instead of frying?
You totally can! For a baked version, spray the breaded chicken generously with cooking spray and bake at 400°F (200°C) for 20-25 minutes, flipping halfway, until golden and cooked through. It won't be quite as crispy as fried, but it's still a delicious and lighter alternative!
- My breading isn't sticking, what went wrong?
Ah, that's often due to moisture! Make sure your chicken is super dry after the pickle brine, and press the Panko mixture onto the chicken firmly. Also, letting the breaded chicken rest for 5-10 minutes before frying can help the coating adhere better. You'll get that perfect Crispy Dill Pickle Chicken crust next time!
Crispy Dill Pickle Parmesan Chicken
Crispy Dill Pickle Parmesan Chicken is a flavorful weeknight dinner. Tender chicken coated in a crispy dill pickle and Parmesan crust. Quick & easy!
Ingredients
The Chicken Canvas
- 1 1/2 lbs boneless, skinless chicken breasts
Tangy Brine & Binder
- 1/2 cup dill pickle juice
- 2 large eggs
Crispy Parmesan Coating
- 1 cup Panko breadcrumbs
- 1/2 cup grated Parmesan cheese
- 1/4 cup all-purpose flour
- 1 tsp garlic powder
- 1 tsp onion powder
- 1/2 tsp dried dill
- 1/2 tsp black pepper
- 1/2 tsp salt
Sauté & Garnish
- 2 tbsp olive oil
- 2 tbsp fresh dill, chopped, for garnish
Instructions
-
1Prep Chicken & BrineSlice 1.5 lbs boneless, skinless chicken breasts horizontally to create 8 thinner cutlets. In a shallow dish, whisk together 1/2 cup dill pickle juice and 2 large eggs. Submerge the chicken cutlets in this Tangy Brine & Binder, ensuring they are fully coated.
-
2Mix Coating IngredientsIn a second shallow dish, combine 1 cup Panko breadcrumbs and 1/2 cup grated Parmesan cheese for the Crispy Parmesan Coating. In a third dish, whisk together 1/4 cup all-purpose flour, 1 tsp garlic powder, 1 tsp onion powder, 1/2 tsp dried dill, 1/2 tsp black pepper, and 1/2 tsp salt.
-
3Dredge Chicken CutletsRemove one chicken cutlet from the Tangy Brine & Binder, letting excess drip off. Dredge it first in the flour mixture, shaking off any extra. Then dip it back into the Tangy Brine & Binder, followed by pressing firmly into the Panko and Parmesan Crispy Parmesan Coating. Repeat for all cutlets.
-
4Heat Oil & SearHeat 2 tbsp olive oil in a large skillet over medium-high heat until shimmering. Carefully place half of the breaded chicken cutlets into the hot pan, ensuring not to overcrowd. This is crucial for achieving a golden crust on your Crispy Dill Pickle Parmesan Chicken | Weeknight Dinner.
-
5Cook Chicken ThoroughlyCook the chicken for 4-6 minutes per side, or until golden brown and cooked through to an internal temperature of 165°F. Remove the cooked Crispy Dill Pickle Parmesan Chicken | Weeknight Dinner to a plate and repeat with the remaining cutlets, adding more olive oil if needed.
-
6Rest and GarnishLet the cooked Crispy Dill Pickle Parmesan Chicken | Weeknight Dinner rest for a few minutes before serving. Garnish generously with 2 tbsp fresh dill, chopped, for a burst of fresh flavor. Serve immediately for the best crispy texture.
Notes
For extra tender and evenly cooked chicken, pound the chicken breasts to about 1/2-inch thickness before slicing. This ensures consistent cooking time and a more uniform Crispy Dill Pickle Parmesan Chicken.
Leftover Crispy Dill Pickle Parmesan Chicken can be stored in an airtight container in the refrigerator for up to 3 days. Reheat in an oven or air fryer at 350°F for 10-15 minutes to regain crispiness.
Feel free to experiment with other cheeses like Pecorino Romano or a sharp white cheddar in place of Parmesan for a different flavor profile in your Crispy Parmesan Coating.
Serve this delicious Crispy Dill Pickle Parmesan Chicken with a side of mashed potatoes, roasted asparagus, or a simple green salad for a complete weeknight meal.
Equipment
Please check ingredients for potential allergens and consult a health professional if in doubt.
Nutrition Facts
It is important to consider this information as approximate and not to use it as definitive health advice.
Comments
Leave a Comment