


Healthy Chicken Pad Thai packed with protein. This quick and easy recipe is perfect for meal prep, offering a nutritious and flavorful weeknight dinner solution.
Okay, so picture this: I was on a mission. A few years back, after a trip that completely changed my palate, I was OBSESSED with recreating that incredible street food experience right in my own kitchen. After many, many attempts (and a few questionable noodle mishaps!), I landed on this recipe. It’s not just a dish, it’s a journey, a memory, and honestly, my go-to for a quick, healthy weeknight meal. Get ready to fall in love with homemade chicken Pad Thai!
Oh, the early days of my Pad Thai adventures! I remember one time, I was so excited, I poured the sauce over the noodles BEFORE I'd even cooked the chicken. Oops! Ended up with soggy, sad noodles and a frantic scramble to sear the chicken separately. It tasted… fine, but the texture was a disaster. Lesson learned: follow the steps, friends!
Ingredients for Healthy Chicken Pad Thai
- 1 lb boneless, skinless chicken breast, thinly sliced against the grain: This is our protein powerhouse, right? Slicing it thin and against the grain is KEY. It means super tender bites that cook up fast, soaking in all those amazing flavors. Trust me, nobody wants chewy chicken in their Pad Thai. This little prep step makes all the difference in achieving that perfectly balanced texture for our healthy version.
- 8 oz dried flat rice noodles (Pad Thai style): These are the heart and soul of any Pad Thai! Don't skimp on quality here. I've tried other noodles, and they just don't have that perfect chew. The trick is to soak, not boil, them until they're pliable but still a little firm. Overcooked noodles are a no-go, turning into a mushy mess. We want that delightful springiness that defines a great Chicken Pad Thai.
- 3 tbsp tamarind paste (seedless): Okay, tamarind paste is the secret weapon for that authentic tangy kick. It's what gives Pad Thai its signature sour note, balancing out the sweet and savory. If you can't find seedless, just strain out the seeds after mixing it with a little warm water. It’s non-negotiable for that true, bright flavor profile. Don't skip it, it's pure magic!
- 3 tbsp fish sauce: Don't be scared by the smell, hon! Fish sauce is the umami bomb in this recipe. It adds depth and a savory complexity that you just can't get anywhere else. It doesn't make your dish taste 'fishy', it just makes it taste more. It’s fundamental to getting that rich, savory foundation for our sauce. A little goes a long way, but it's essential!
- 2 tbsp maple syrup: Maple syrup is my go-to for sweetness here, instead of refined sugar. It brings a lovely, subtle caramel note that complements the tamarind and fish sauce so beautifully. It’s a healthier swap that doesn't compromise on flavor. You want that perfect balance of sweet, sour, and savory, and maple syrup helps us hit that sweet spot every time.
- 1/4 cup fresh lime juice (from 2-3 limes): Fresh lime juice? Oh, it's a non-negotiable burst of sunshine! It brightens everything up, adding a zesty finish that makes your palate sing. Bottled stuff just doesn't compare, trust me. Squeeze those limes right before you use them for maximum impact. That fresh acidity is the final touch that elevates the entire dish, making it pop!
Making Your Best Chicken Pad Thai, Step by Step
- Step 1: Soak Noodles & Prep:
- First things first, get those flat rice noodles soaking in warm water. Not hot, not cold, just warm enough to make them pliable. You want them bendy, but still with a slight bite al dente, almost. While they're chilling out, get your chicken sliced thin, your garlic minced, and ginger grated. This prep work is your secret weapon for a stress-free cooking experience later, making this Chicken Pad Thai come together like a dream.
- Step 2: Whisk Pad Thai Sauce:
- Now for the star of the show: the sauce! Grab a bowl and whisk together the tamarind paste, fish sauce, low-sodium soy sauce, maple syrup, and fresh lime juice. Give it a good taste does it hit all the notes? Sweet, sour, savory, a little salty? Adjust if you need to. This sauce is what makes our Healthy Chicken Pad Thai so incredibly addictive, so don't be shy about making it perfect for your palate.
- Step 3: Sear Chicken Breast:
- Heat that avocado oil in your wok or large skillet until it's shimmering. Then, toss in your thinly sliced chicken breast. We're looking for a beautiful golden-brown sear here, not just cooking it through. Get some color on it! This caramelization adds so much flavor. Once it’s cooked, remove it from the pan and set it aside. Don't crowd the pan, or you'll steam it instead of sear, and we want crispy, delicious chicken for this dish!
- Step 4: Sauté Aromatics & Veggies:
- In the same pan, add a tiny bit more oil if needed. Toss in your minced garlic and grated ginger. Oh, the smell! Cook them until fragrant about 30 seconds, don't let them burn. If you're adding any extra veggies like bean sprouts or chives, now's the time to throw them in for a quick sauté. We want them tender-crisp, adding great texture to our Chicken Pad Thai.
- Step 5: Combine Noodles & Sauce:
- Drain your soaked noodles well. Add them to the pan with the aromatics. Pour in that incredible sauce you whisked up. Using tongs, gently toss everything together until the noodles are evenly coated and start absorbing that vibrant color. Keep it moving! You're looking for that perfect, glossy finish. This step is where the magic really happens, transforming simple ingredients into a cohesive, flavorful Chicken Pad Thai.
- Step 6: Add Eggs & Finish:
- Push the noodles to one side of the pan, creating a clear space. Crack in one or two eggs directly into that space. Scramble them quickly with your spatula until they're just cooked. Then, fold the cooked eggs and the seared chicken back into the noodles. Give it all one final, gentle toss to combine. You're almost there! This is the moment your amazing Pad Thai comes alive.
Honestly, cooking this dish is such a joy. There’s something so satisfying about seeing all those vibrant ingredients come together in a flash. The sizzle of the chicken, the aroma of ginger and garlic, then that gorgeous sauce coating everything… it just feels like pure kitchen magic. Every time I make it, I get that little thrill of creating something so delicious from scratch!
Keeping Your Pad Thai Fresh: Storage Secrets
Okay, so you've got leftovers? Amazing! This Chicken Pad Thai actually keeps really well, which is why it's a meal prep superstar. Just make sure it cools down completely before you pop it into an airtight container. I've made the mistake of putting it straight into the fridge while still warm, and it gets a bit… steamy and soggy. Not ideal! It'll stay fresh in the fridge for 3-4 days. To reheat, a quick toss in a hot skillet with a splash of water or broth works wonders to revive those noodles. Microwaving is okay, but the skillet gives it that fresh-cooked texture back. Trust me on this, nobody wants sad, dry noodles!

Swapping Ingredients for Your Perfect Pad Thai
I've played around with so many variations of this recipe, and honestly, it's pretty forgiving! If chicken isn't your thing, shrimp or even firm tofu (pressed and pan-fried first!) work beautifully. For veggies, feel free to toss in some thinly sliced carrots, bell peppers, or even broccoli florets. Just cook them until tender-crisp. No tamarind paste? A mix of rice vinegar and a tiny bit of brown sugar can mimic the tang, though it won't be quite the same depth. For gluten-free, use tamari instead of soy sauce. Maple syrup can be swapped for brown sugar or agave. Get creative, make it your own, that's what home cooking is all about!
What to Serve with Your Delicious Chicken Pad Thai
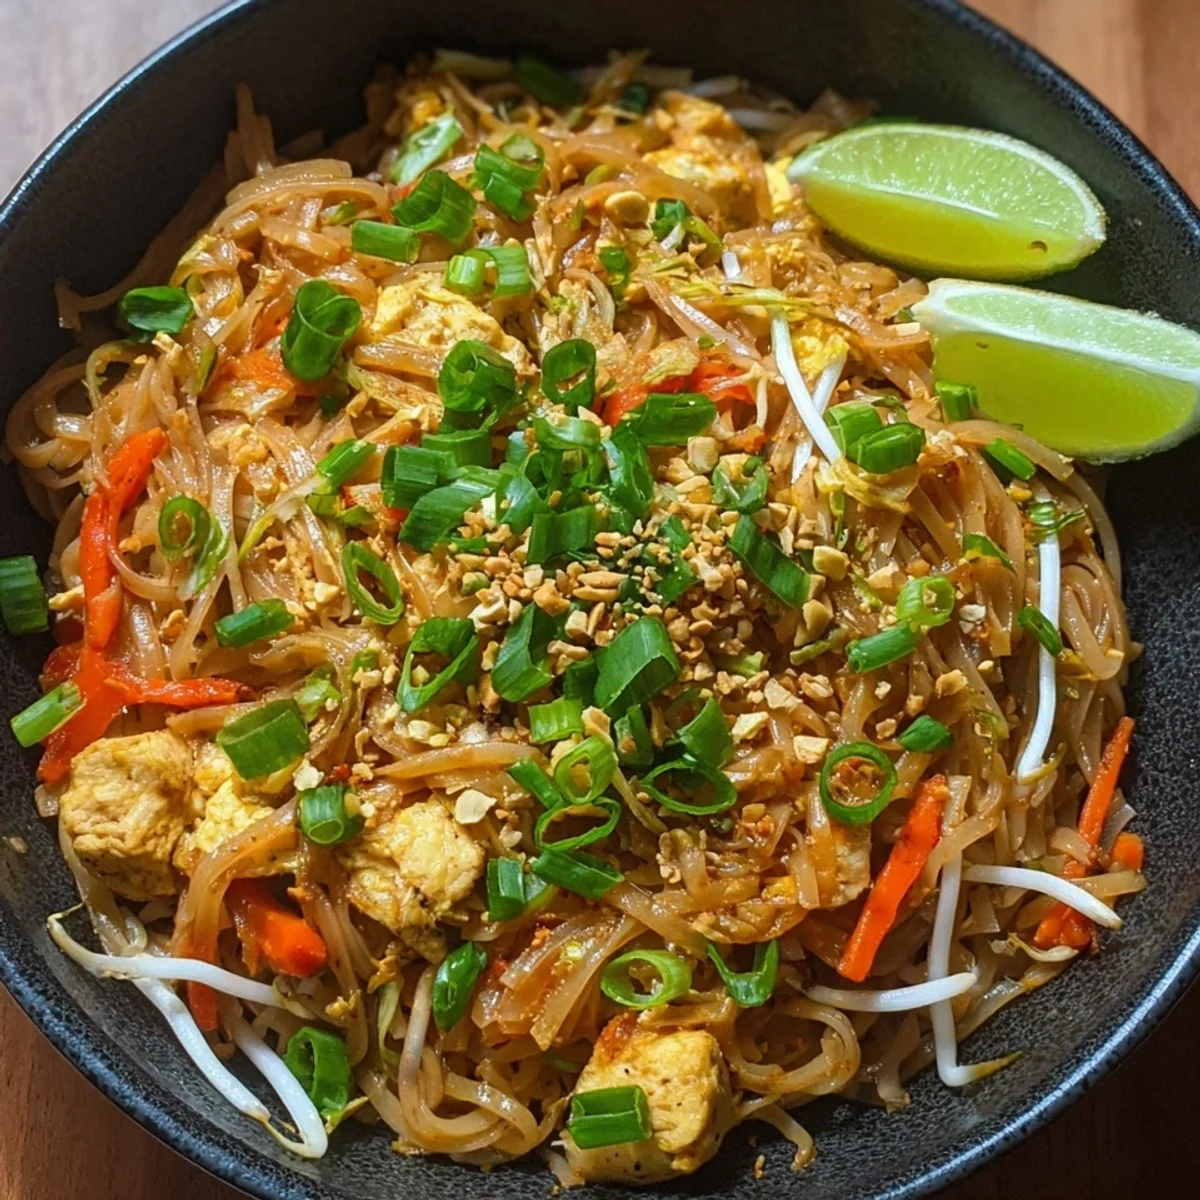
Alright, your incredible Chicken Pad Thai is ready! Now, how to serve it up like the superstar it is? A generous sprinkle of chopped roasted peanuts is a must for that crunch and nutty flavor I sometimes forget, and I'm always disappointed! Fresh lime wedges on the side are non-negotiable for an extra burst of zing. If you like a little heat (like me!), a dash of sriracha or some chili flakes takes it up a notch. For a complete meal, I sometimes serve it with a simple side salad with a ginger-sesame dressing, or some steamed edamame. It makes the whole meal feel so balanced and fresh. Don't forget fresh cilantro for that vibrant pop of color and flavor!
The Story Behind This Amazing Dish
Whenever I make Pad Thai, I can't help but think about its amazing journey. It's not some ancient recipe, believe it or not! It became Thailand's national dish in the 1930s and 40s, promoted by the government to unify the country and even help with rice shortages during wartime. It was a way to encourage people to eat rice noodles instead of just plain rice. From street carts to fine dining, it’s a dish that tells a story of national identity and resilience. It reminds me how food connects us, across cultures and through history. It's more than just noodles, it's a piece of history on your plate, and honestly, that makes every bite even more special.
So there you have it, friends! My go-to recipe for a healthy, high-protein meal that never disappoints. This dish is a real labor of love, perfected over many kitchen adventures. I hope it brings as much joy to your table as it does to mine. Give it a try, snap a pic, and let me know how it turns out in the comments below! Happy cooking!

Your Burning Questions About Pad Thai, Answered!
- → Can I use different protein for this Chicken Pad Thai?
Oh, yes! I've had great success with shrimp, thinly sliced pork, or even firm tofu. If using tofu, press it well to remove excess water, then pan-fry until golden before adding to the dish. Just adjust cooking times accordingly. The sauce is so versatile, it pairs well with almost anything!
- → My noodles are sticking together, what went wrong?
Ah, common issue! This usually happens if they're oversoaked or not properly tossed with enough oil/sauce. Make sure they're just pliable after soaking. Also, keep that heat high and keep stirring! A little extra oil in the pan can help prevent sticking when you're combining everything.
- → Is tamarind paste essential, or can I skip it?
Honestly, it's pretty essential for that authentic Pad Thai tang! Without it, the dish won't have the same depth or signature sour notes. If you're really in a pinch, a mix of rice vinegar and a touch of brown sugar can offer a similar idea of flavor, but it won't be the same.
- → How do I make this Pad Thai spicier?
Easy peasy! You can add a pinch of red chili flakes to the aromatics when you're sautéing the garlic and ginger. Or, for a fresher kick, serve it with a side of sriracha or chopped fresh bird's eye chilies. I love a good spicy Pad Thai myself, so I often do both!
- → Can I add more vegetables to this recipe?
Oh, yes, please do! I often throw in whatever I have on hand. Thinly sliced bell peppers, shredded carrots, snap peas, or even a handful of baby spinach at the very end work wonderfully. Just add them with the aromatics and cook until tender-crisp. More veggies, more goodness!
Healthy Chicken Pad Thai: High Protein Meal Prep
Healthy Chicken Pad Thai packed with protein. This quick and easy recipe is perfect for meal prep, offering a nutritious and flavorful weeknight dinner solution.
Ingredients
The Lean Protein & Noodle Foundation
- 1 lb boneless, skinless chicken breast, thinly sliced against the grain
- 8 oz dried flat rice noodles (Pad Thai style)
The Tangy Umami Elixir
- 3 tbsp tamarind paste (seedless)
- 3 tbsp fish sauce
- 2 tbsp low-sodium soy sauce (or tamari for gluten-free)
- 2 tbsp maple syrup
- 1/4 cup fresh lime juice (from 2-3 limes)
Vibrant Veggies & Aromatics
- 1 tbsp avocado oil (or peanut oil)
- 2 cloves garlic, minced
- 1 tbsp fresh ginger, grated
- 1 red bell pepper, thinly sliced
- 1 cup shredded carrots
- 2 cups fresh bean sprouts
- 4 green onions, sliced (white and green parts separated)
Finishing Touches & Healthy Fats
- 2 large eggs, lightly beaten
- 1/2 cup unsalted roasted peanuts, chopped
- 1/4 cup fresh cilantro, chopped, for garnish
- Lime wedges, for serving
Instructions
-
1Soak Noodles & PrepSoak 8 oz dried flat rice noodles in hot water for 10-15 minutes until pliable but still firm. Drain and set aside. While noodles soak, prepare your remaining ingredients: thinly slice 1 lb boneless, skinless chicken breast against the grain and chop 1/4 cup fresh cilantro.
-
2Whisk Pad Thai SauceIn a small bowl, whisk together 3 tbsp tamarind paste, 3 tbsp fish sauce, 2 tbsp low-sodium soy sauce, 2 tbsp maple syrup, and 1/4 cup fresh lime juice. This creates the essential tangy-sweet sauce for your Healthy Chicken Pad Thai: High Protein & Quick Meal Prep.
-
3Sear Chicken BreastHeat 1 tbsp avocado oil in a large wok or skillet over medium-high heat. Add the thinly sliced 1 lb boneless, skinless chicken breast and cook for 3-5 minutes until browned and cooked through. Remove chicken from the pan and set aside.
-
4Sauté Aromatics & VeggiesAdd 2 cloves minced garlic, 1 tbsp grated fresh ginger, and the white parts of 4 sliced green onions to the pan. Sauté for 1 minute until fragrant. Add 1 red bell pepper and 1 cup shredded carrots, cook for 2-3 minutes until slightly tender-crisp.
-
5Combine Noodles & SauceReturn the cooked chicken to the pan. Add the drained 8 oz dried flat rice noodles and the prepared Pad Thai sauce. Toss everything together for 2-3 minutes, ensuring the noodles are evenly coated and heated through. This is where your Healthy Chicken Pad Thai: High Protein & Quick Meal Prep truly comes alive.
-
6Add Eggs & FinishPush the noodle mixture to one side of the pan. Pour 2 lightly beaten large eggs into the cleared space and scramble until just set. Incorporate the eggs into the noodles. Stir in 2 cups fresh bean sprouts and the green parts of 4 sliced green onions. For a truly satisfying Healthy Chicken Pad Thai: High Protein & Quick Meal Prep, ensure all ingredients are well combined.
-
7Garnish & ServeRemove from heat. Divide the Healthy Chicken Pad Thai: High Protein & Quick Meal Prep among four plates. Garnish each serving generously with 1/2 cup chopped unsalted roasted peanuts, 1/4 cup fresh cilantro, and fresh lime wedges for serving.
Notes
Meal Prep Tip: This dish is excellent for meal prep! Store individual portions in airtight containers in the refrigerator for up to 3-4 days. Reheat gently in the microwave or on the stovetop.
Spice It Up: For a kick, add 1/2 tsp red pepper flakes with the garlic and ginger, or serve with sriracha on the side.
Veggie Variations: Feel free to add other quick-cooking vegetables like snap peas, broccoli florets, or thinly sliced cabbage during step 4.
Gluten-Free Option: Ensure you use tamari instead of soy sauce and check your fish sauce label for gluten-free certification.
Equipment
Please check ingredients for potential allergens and consult a health professional if in doubt.
Nutrition Facts
It is important to consider this information as approximate and not to use it as definitive health advice.
Comments
Leave a Comment